There are many steps in setting up your SimpliGet solution. Follow this guide for a high-level overview on this process. However, if you have any issues along the way, don't hesitate to reach out to your account manager for help.
SimpliGet Hardware
Current Hardware available today
Star Printer – This is the same thermal printer Avanti Markets has used in the micro market kiosks since inception.
Current Lockers - Two formats
12 smaller cubbies
4 larger cubbies on the bottom of the unit
A single Lockers tower can be daisy chained to other Lockers
UV sanitizing process automatically runs after each order is picked up by the consumer


Future Equipment
We are looking at stand-alone cloud printer solutions that are not require to be connected to a PC
Other possible locker configurations may be offered in the future
SimpliGet Remote Ordering
A seamless way to bring your kitchen & commissary offerings right to your consumers
Integrated with AMS
Control menus and daily offerings from your menu site


AMS and Kitchen Location Creation
Create your Kitchen as you would any other micro market
Add your market locations in AMS
Add and extend your products to the Kitchen market location
Create your tax rate and map to the market location
Important
Ready made fresh food products may be taxed differently.


Location Creation – Product Category Creation
Use Product Categories to manage inventory
Separating your remote order / locker products into their own category is a critical step in setting up your SimpliGet for success.
Go to the admin tab and select Organization Lookups

Click on Category

Click the New Button
Enter the Category Name and click create

Product Creation and Taxes
Next steps
Name your Product Category with something easy to identify. Examples:
Remote Orders
Lockers Food
Food Delivery
Map the tax and deposit categories
Extend your products to the Remote Kitchen location

Set up Remote Order Market Location
Remote Order Market location’s main purpose is a designated delivery location.
You will need to create a location in AMS for each Locker or Pick up counter.
Ensure the market location address is correct.
Remote order locations that use Lockers will need the hardware deployed to the market location which is similar to deploying a kiosk.
The market location will need tax and deposits mapped properly.
Important
Products are NOT extended to the Remote Order Market locations in AMS. Products need to be added to the Kitchen Market location in AMS and managed through the manage site.

Set up Kitchen Location
The Remote Ordering Kitchen’s purpose is to propagate products to the manage site and send orders to the food production kitchen.
All products added to the Kitchen location in AMS will propagate to the Manage site allowing custom menus to be built for your remote delivery market locations.
Kitchen printer is deployed to the AMS kitchen the same as a market kiosk.


Manage Site – Getting Started
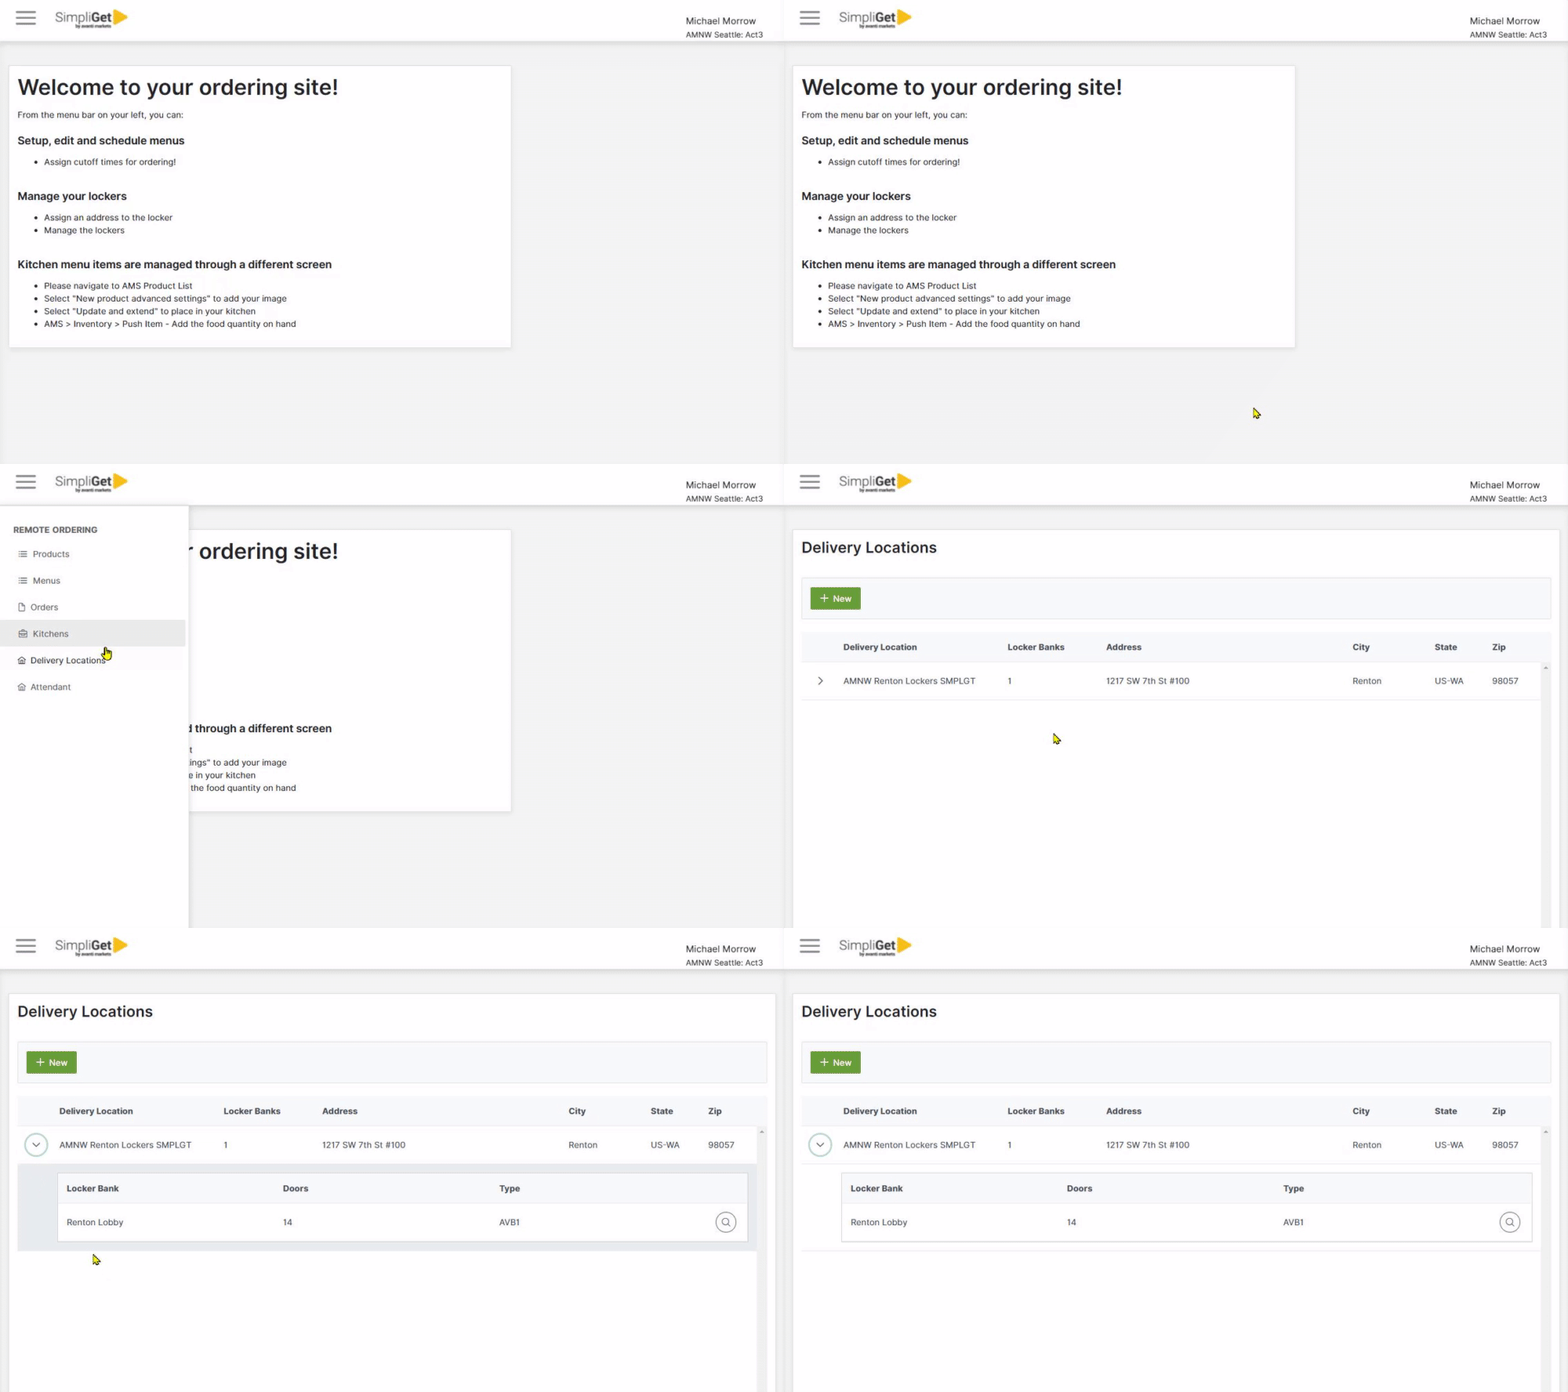
Once you have logged into the manage site you will be presented with a drop-down menu
Products – Allows you to add custom images
Menus – Able to create menus and extend to specified remote order locations
Orders – Kitchen production orders are received
Kitchens – Kitchens where orders are received. Operators can have multiple kitchens setup in the manage site/AMS
Delivery Locations – Includes delivery address, specifies number of Lockers, or pick up window

Products Manage Site
Products that were added to the AMS kitchen will propagate into the manage site
Select the product category to access products
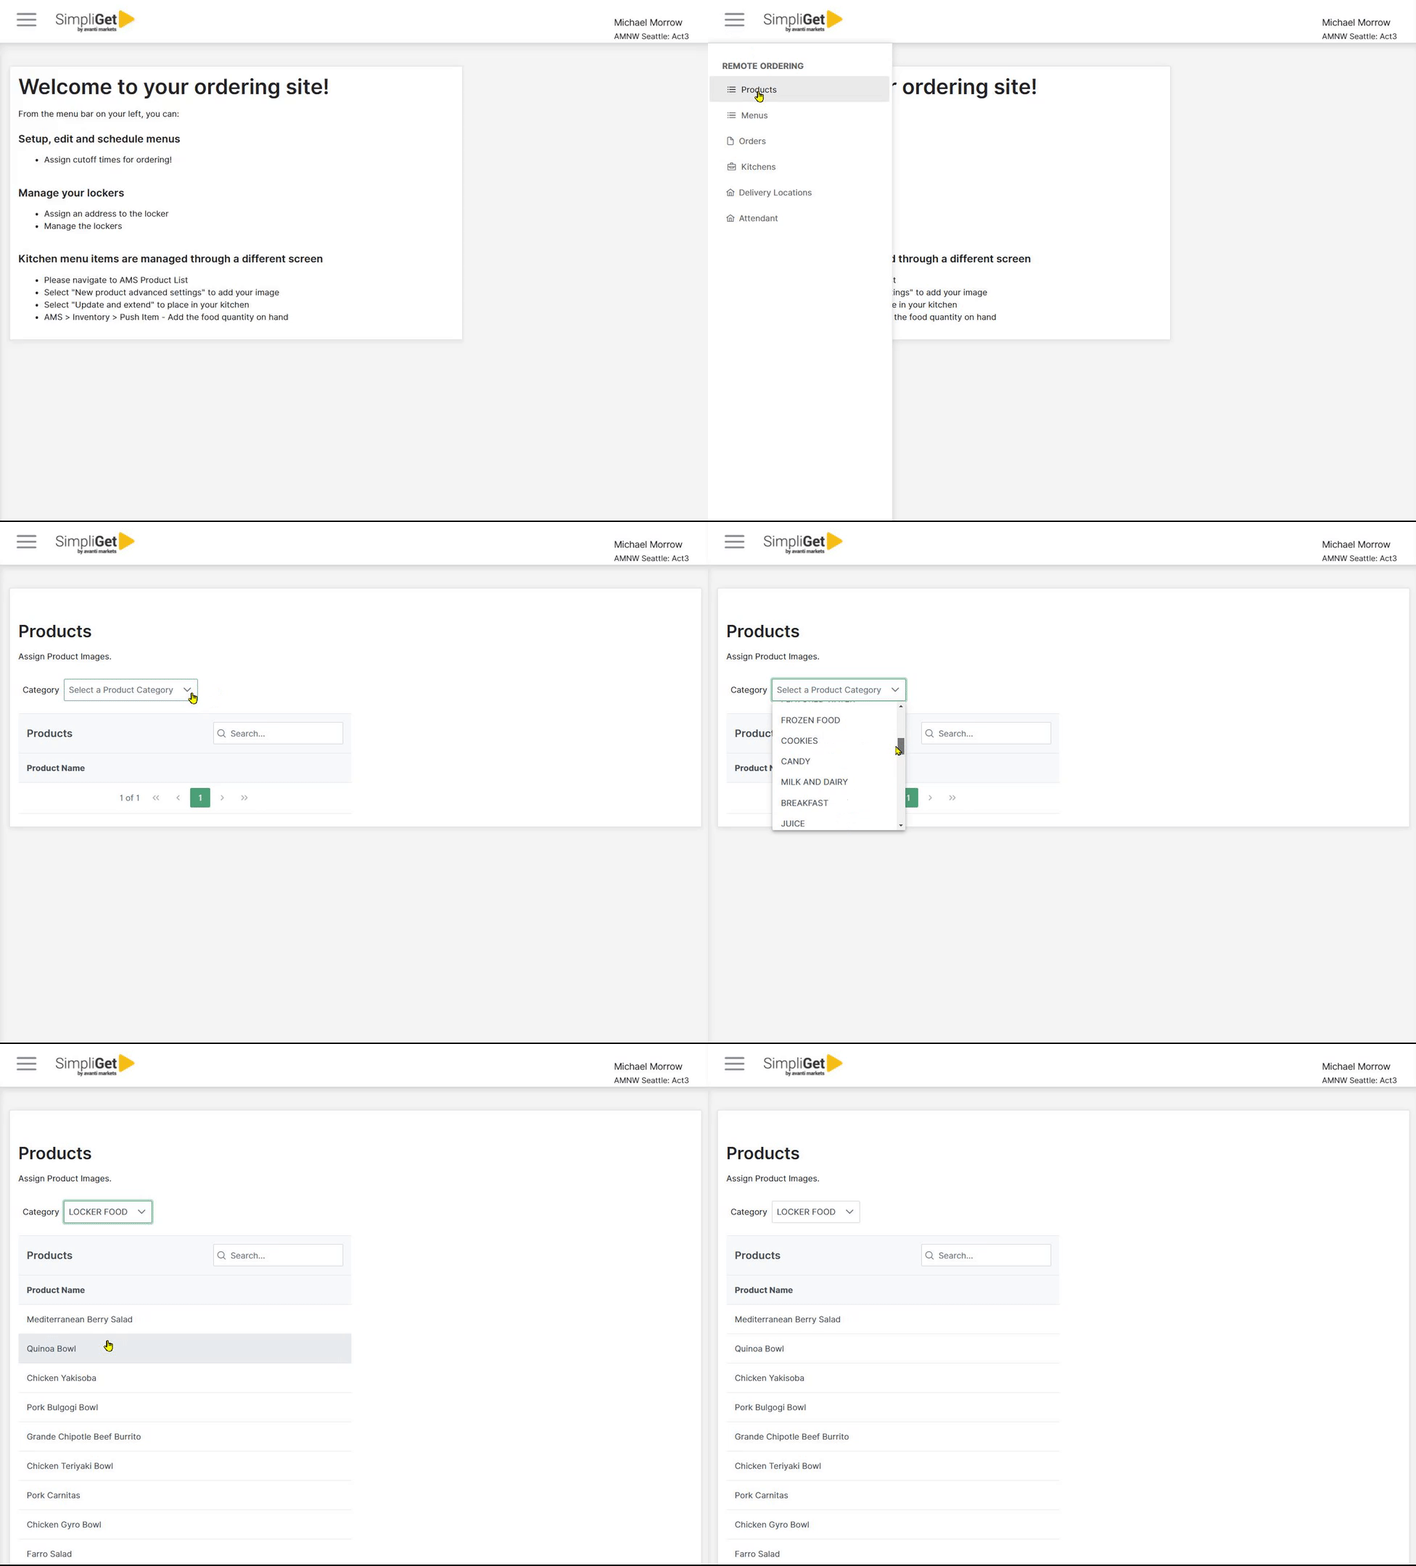
Upload your high-quality image to each product
Image Requirements can be up to 100kb in size and they should be square to render properly

Build Menus in the SimpliGet Manage Site
Click the New Menu Button to create a new menu
Name your menu
Associate the menu with the appropriate kitchen
Select the products that you want to include in your menu
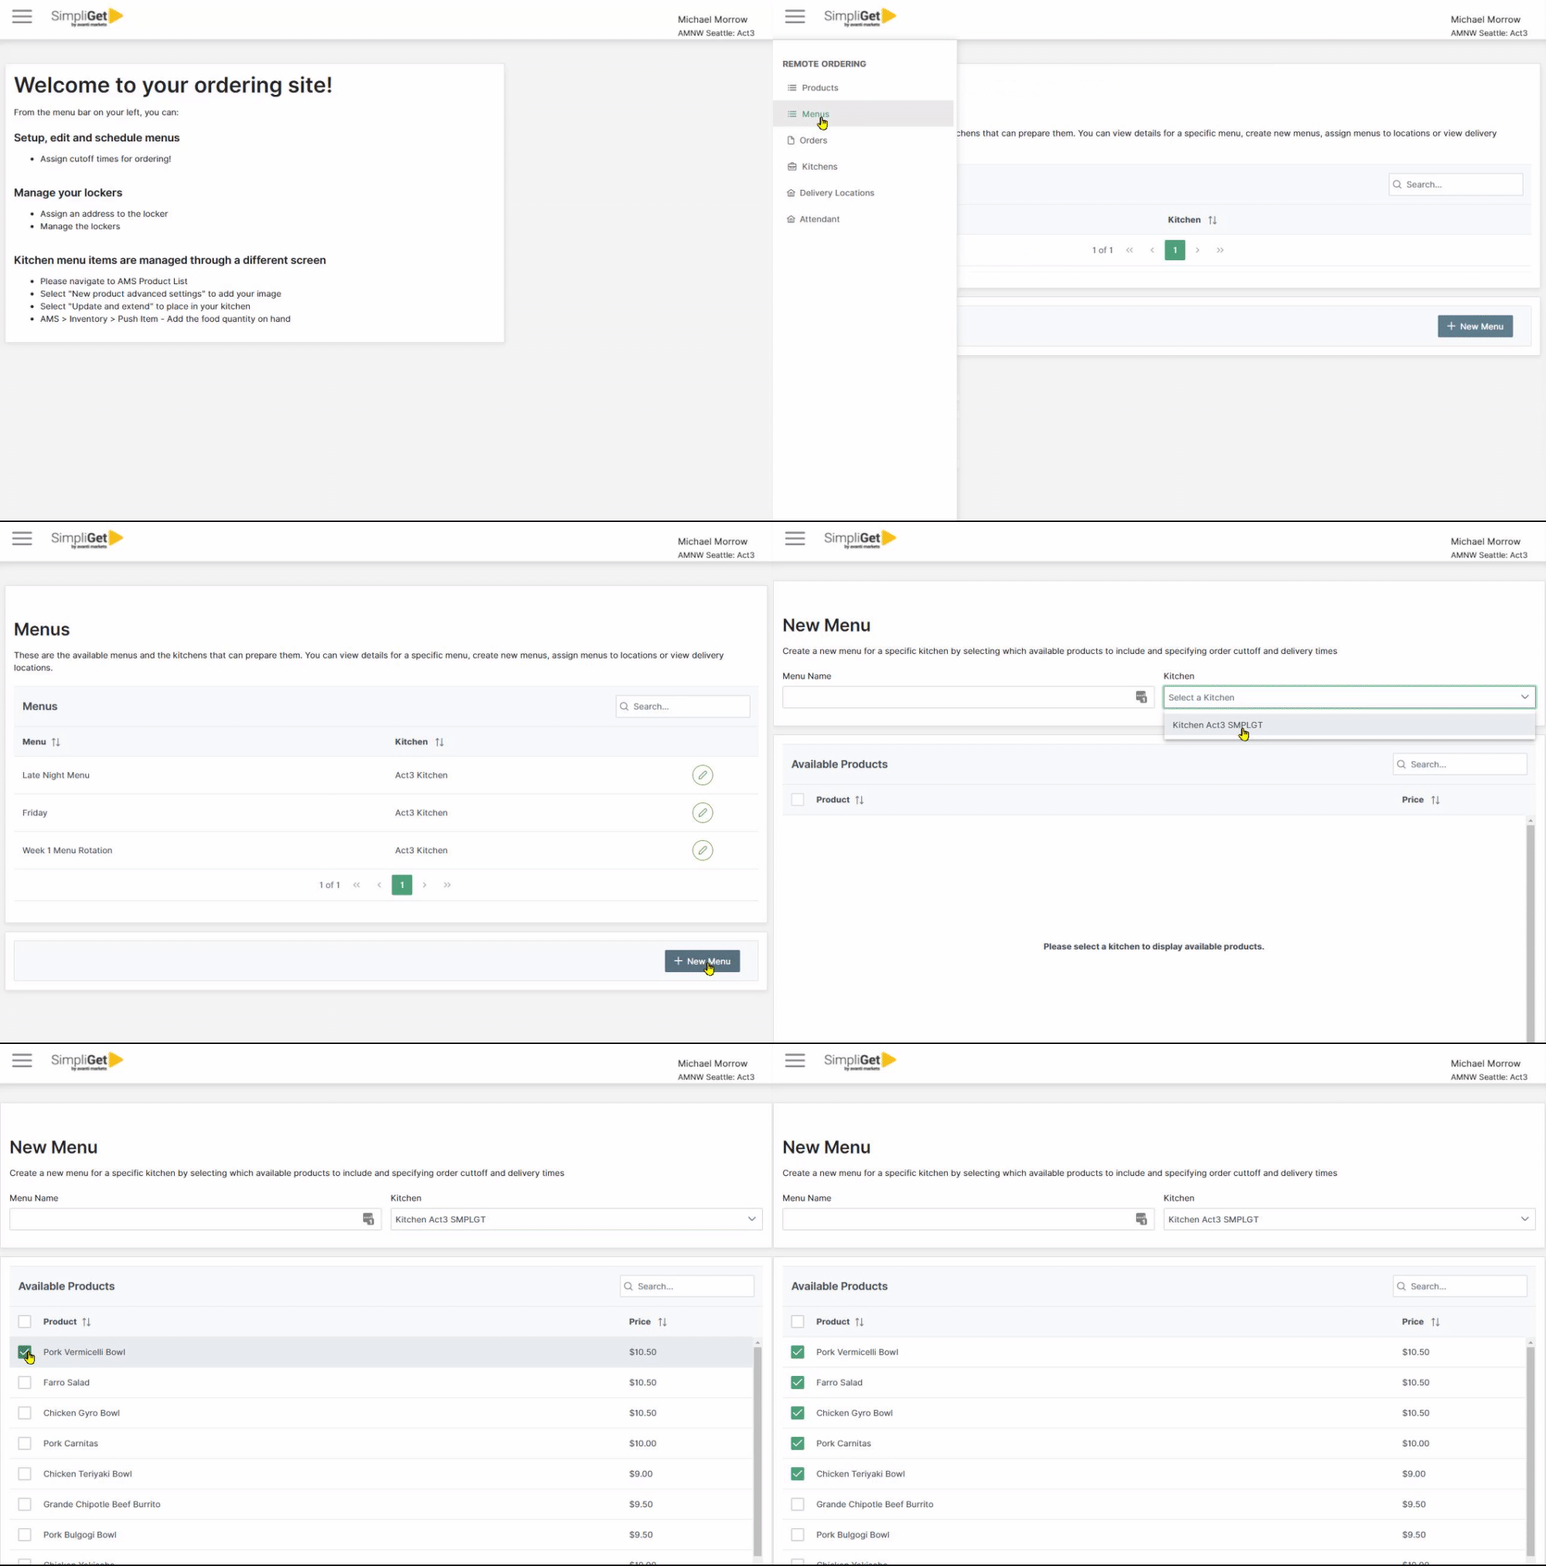
You can manage multiple menus and edit them when needed
A menu can be used at single or multiple Remote order locations
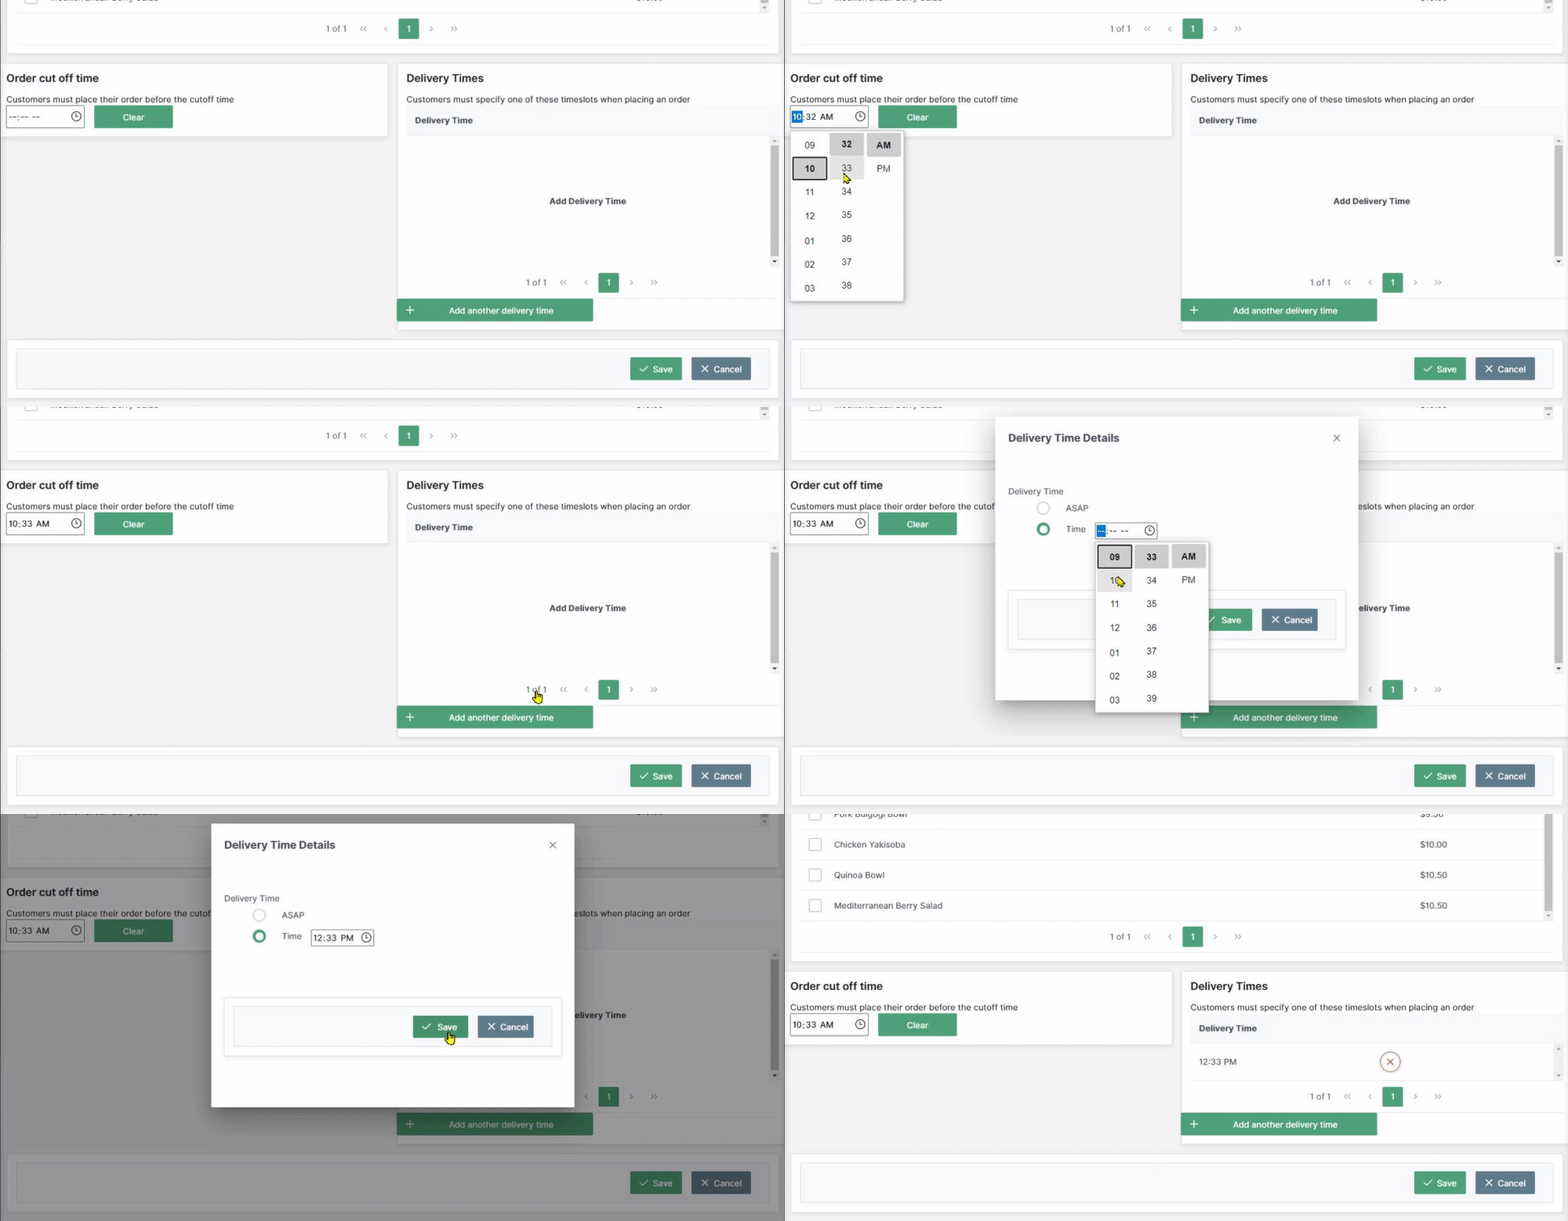
Create your order cutoff times for each menu you have created
Create your delivery times you offer to each customer location
You can create a single or multiple delivery times for each menu
You can also select ASAP which is a great option for onsite kitchens with pick up window
Kitchen Orders Manage Site
All Consumer Remote Orders will be sent to the Kitchen
Each order received will generate a printed order receipt
All active and future orders can be tracked in the orders queue
Future queue displays orders more than 2 hours in the future

The product, location, and location number will be included with each order
Locker’s cubby size may be changed for larger orders/products
Orders can be marked as done
Cancel button frees the cubby, messages the customer that the order cannot be fulfilled, and issues a credit to their market card account
Kitchen Manage Site
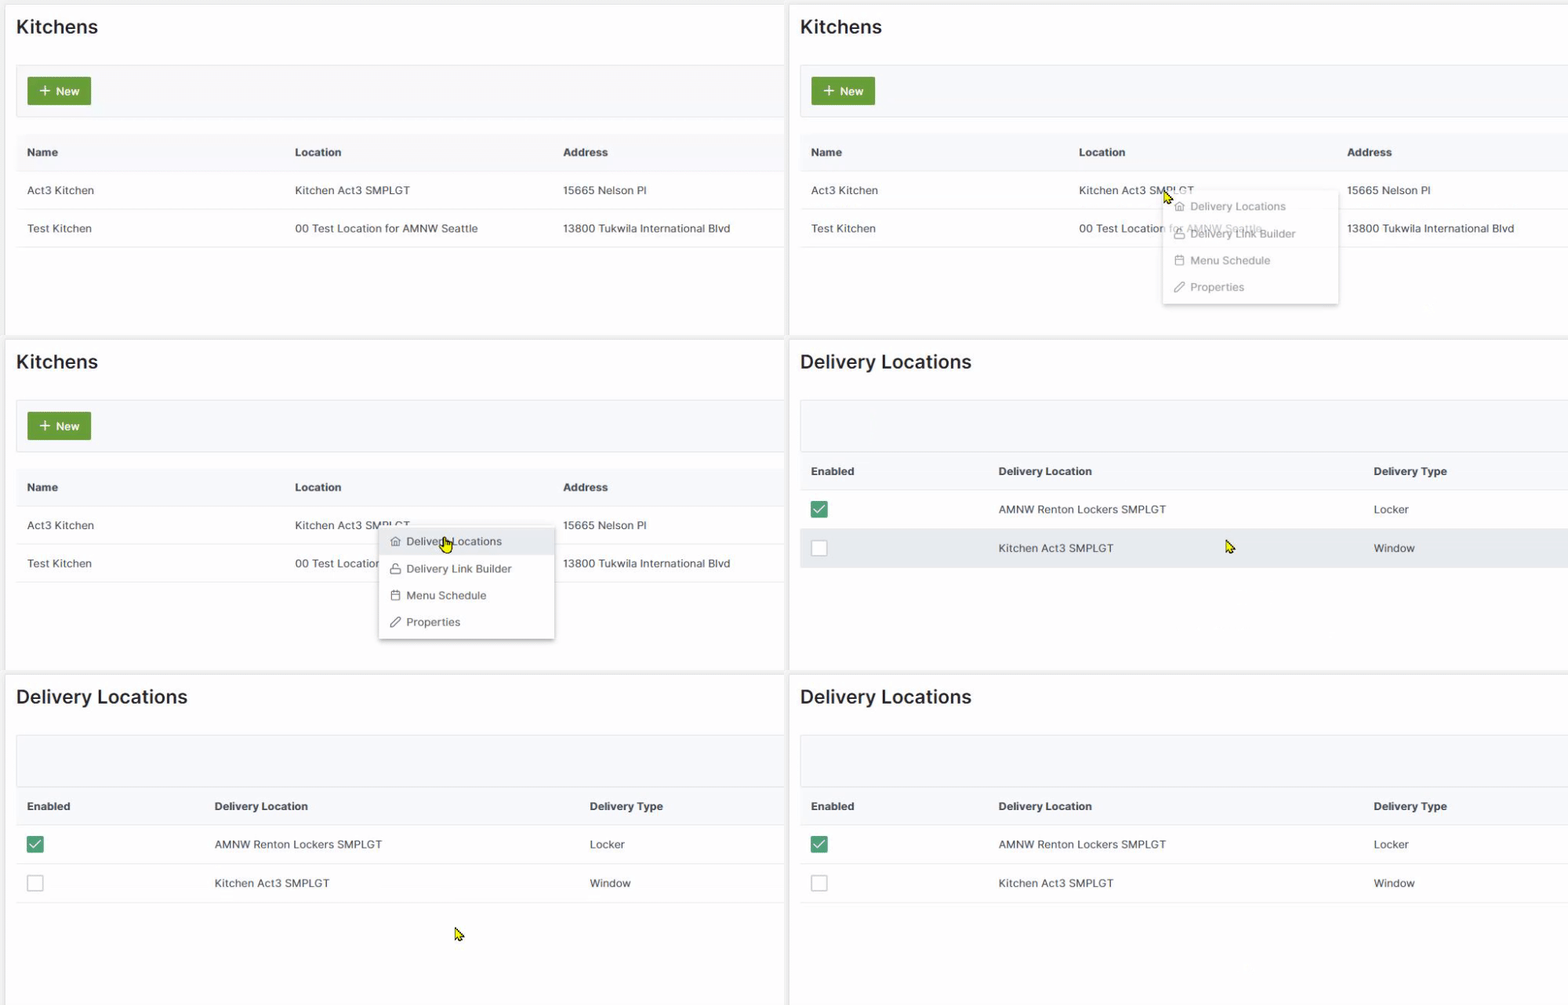
You can create a new kitchen from the manage site and associate it with an AMS Remote Order location.
This is very helpful if you are managing multiple kitchens and need to associate a location to the nearest kitchen.
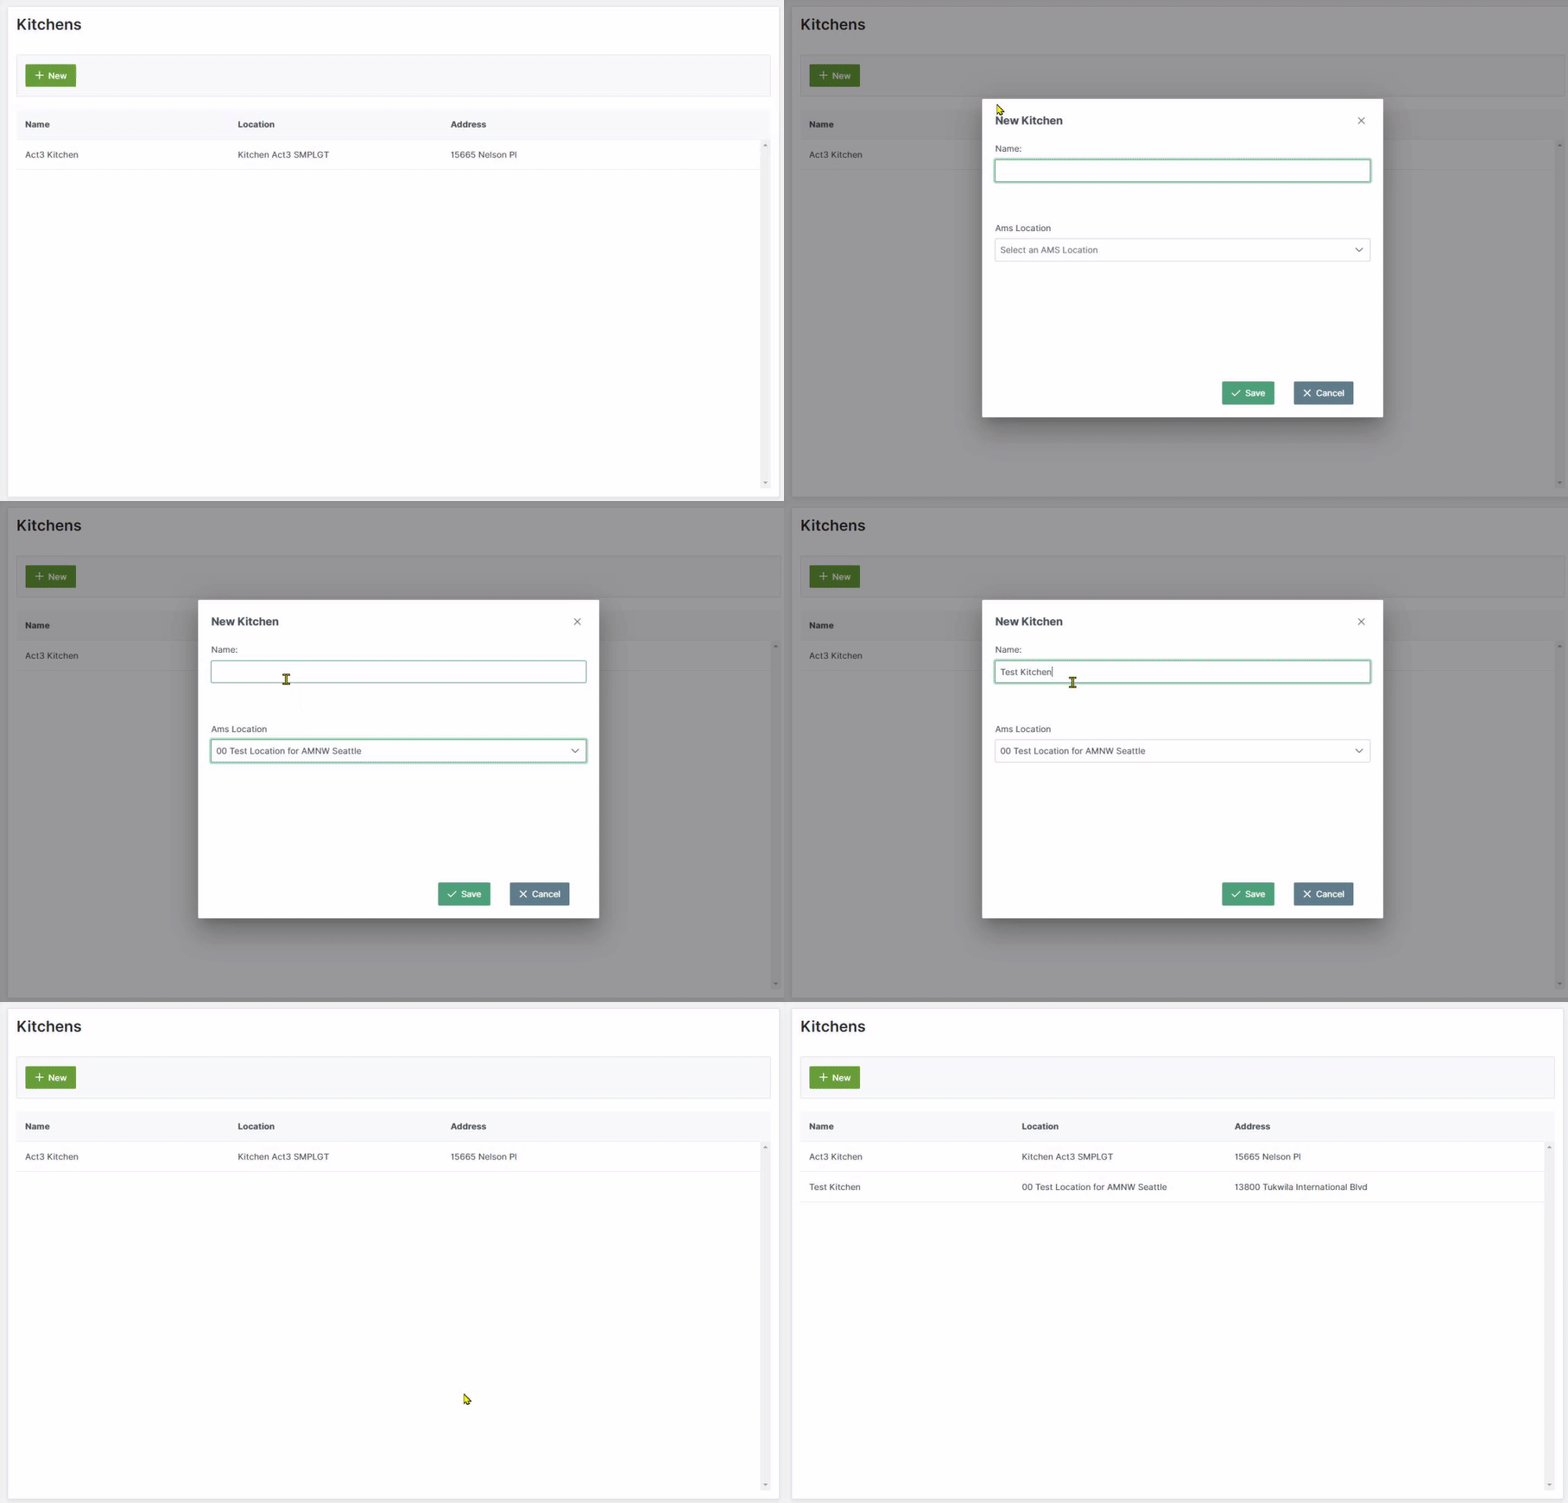
To enable or disable delivery locations from a specific kitchen, right click the kitchen entry and select "Delivery Locations" from the menu.
Delivery Locations Manage Site
Manage your remote delivery locations
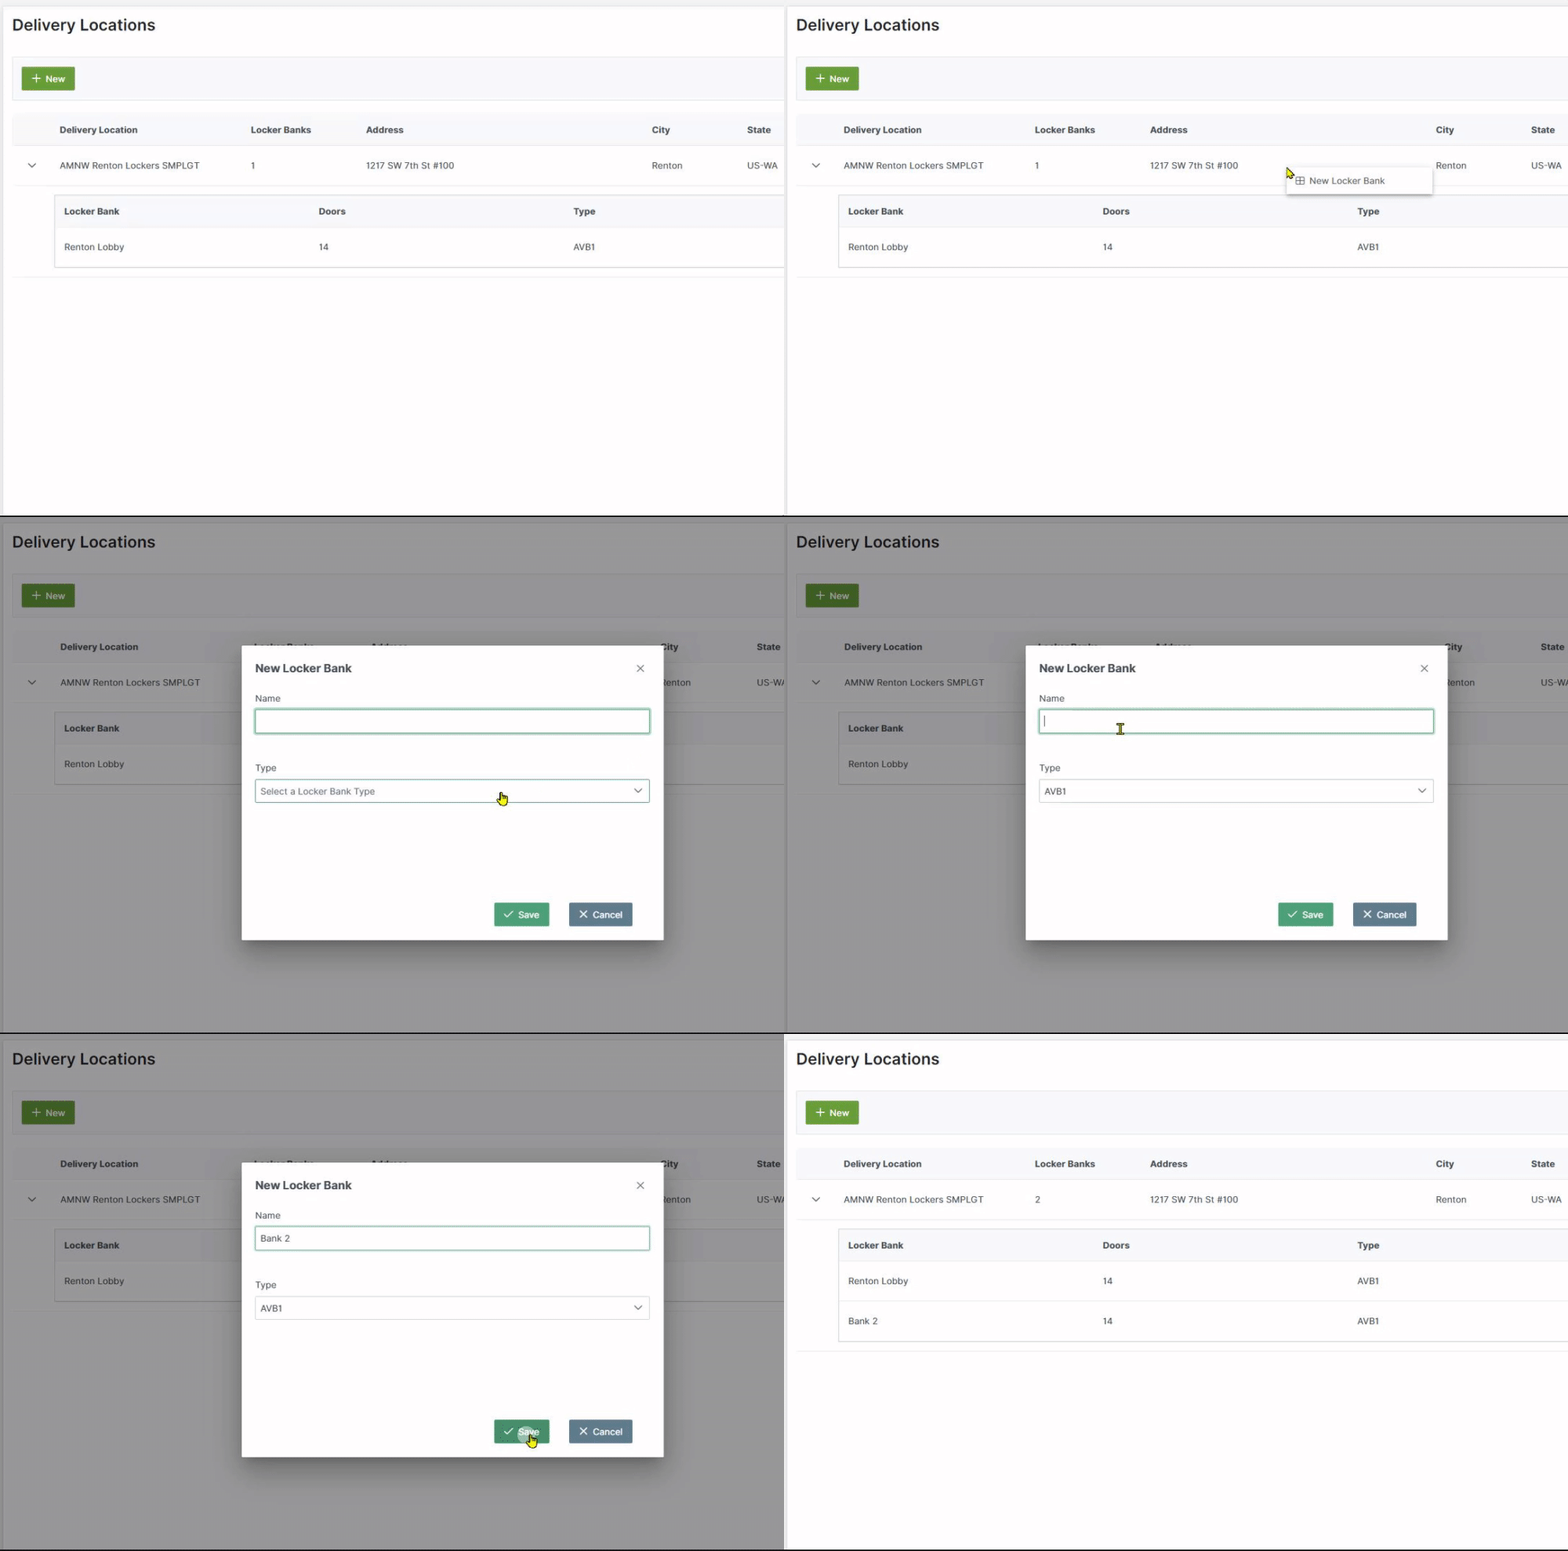
If Lockers are deployed at a remote order location, you can see how many locker banks are associated with them.
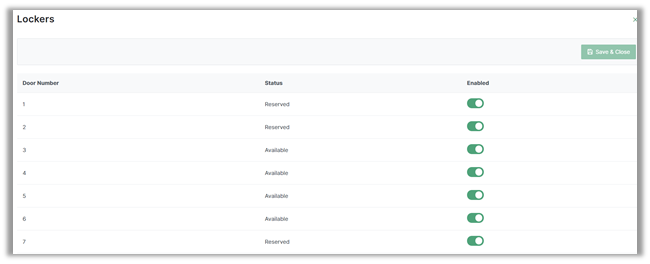
The number of cubby doors are visible for each Lockers bank.
You can view the status of each Lockers cubby by clicking spyglass icon to the right of the locker entry.
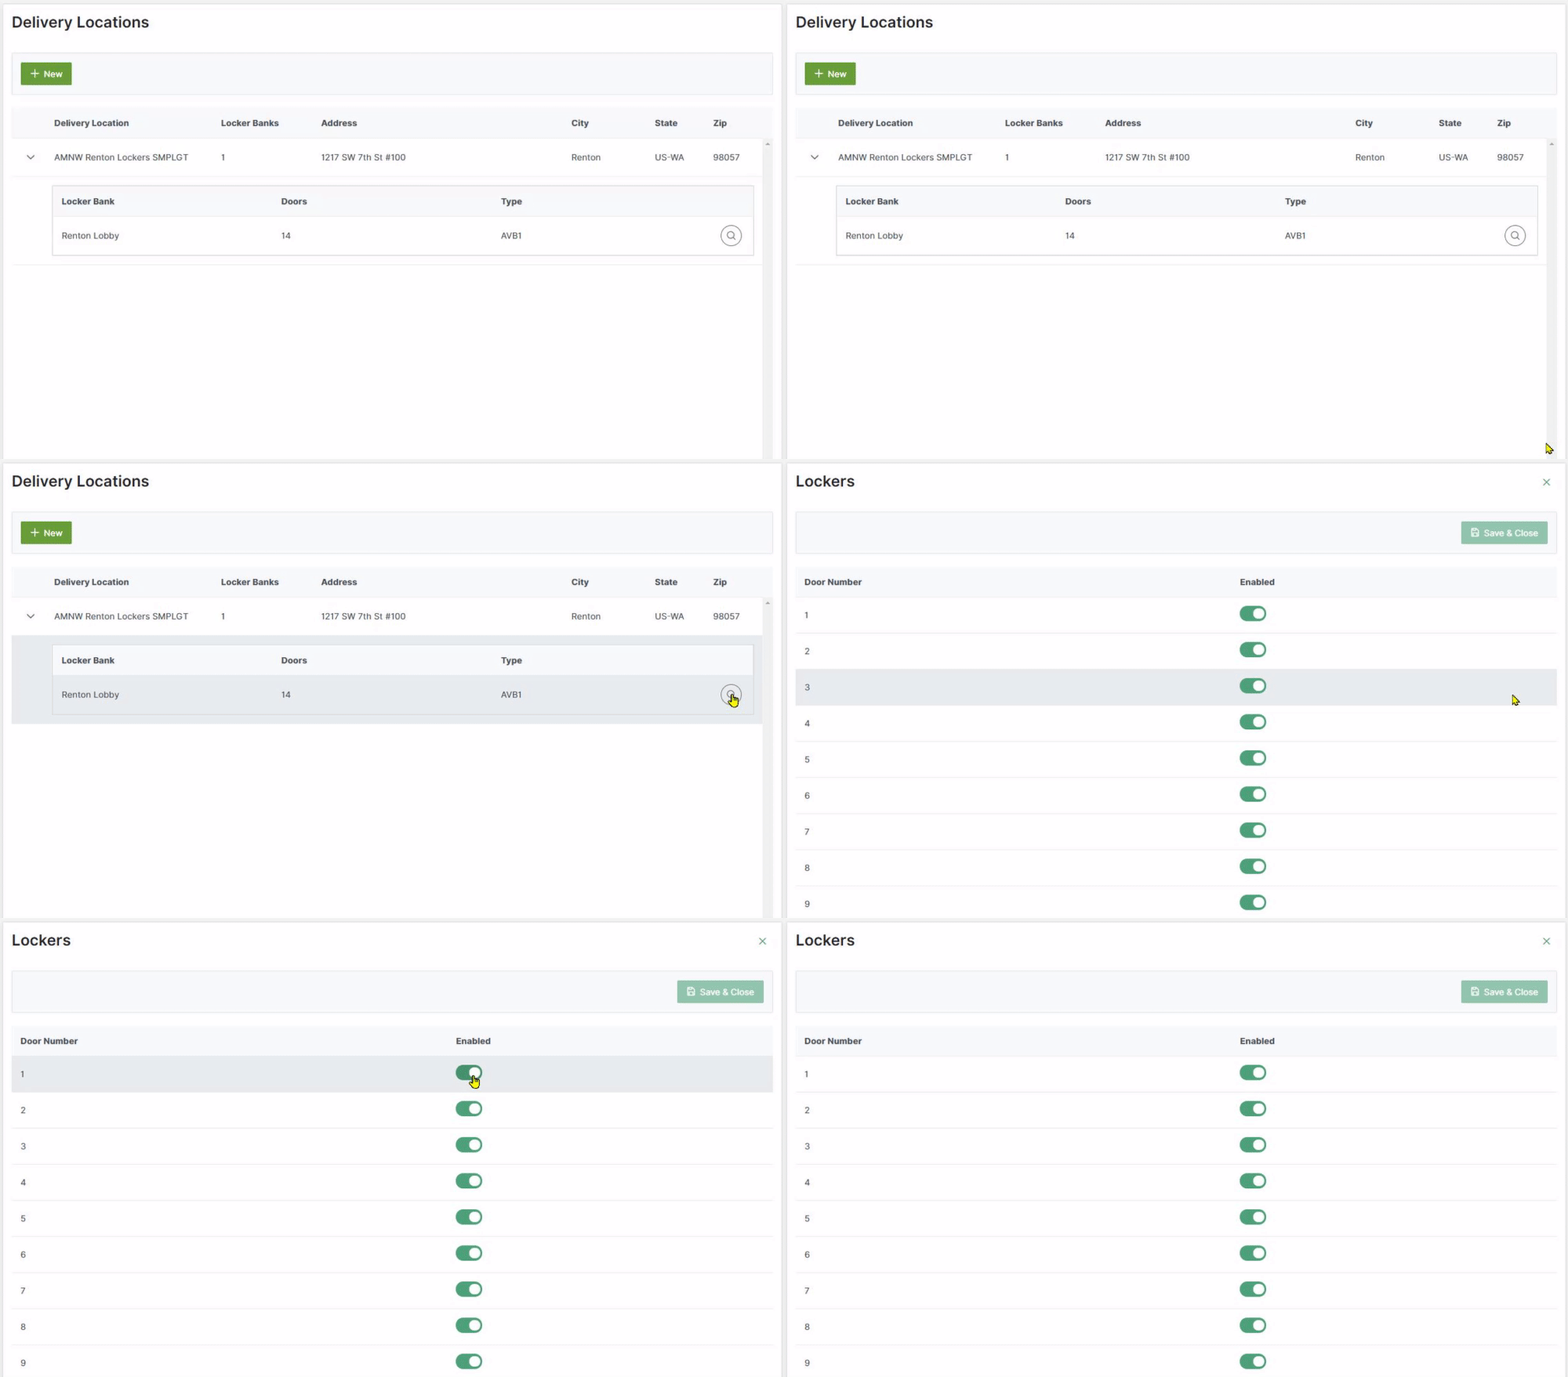
Reserved status indicates that there is an order to be placed in that cubby.
The operator can enable or disable a cubby door.
The operator may want to disable a cubby for maintenance purposes.
To add a locker bank to an existing delivery location (if you are, for example, expanding capacity at a location), right click the existing location and select "New Locker Bank"
As of right now, you cannot delete a locker bank manually. You must work through Avanti support for this since it has potential business-impacting implications.
