Purpose
SensorSwarm relay devices connect via Bluetooth to PicoMarket devices. This guide serves to inform anyone installing these devices of the optimal placement of each device so that communication between them is seamless and steady.
To accommodate the wide-ranging needs of every location and organization, these guidelines have been kept very general.
General Information
Each relay can service up to 8 sensors. Each of these sensors broadcasts its unique IDs via Bluetooth, to be picked up by the relay. Relays placed throughout the location will connect to those sensors, and receive that unique ID. Once this happens, the sensor disconnects from the relay. The relay then broadcasts via Bluetooth to the Pico to transmit those sensor IDs. Finally, after the Pico receives that data, the relay disconnects from the Pico, and the Pico forwards all of the data via a cellular signal to the SwarmTemp Host.

The 3 Most Important Rules of Set-Up:
-
Minimize Obstacles Between Devices
Barriers between these devices can block the Bluetooth signals sent, causing communication issues. These barriers can include walls, doors, countertops, and other solid, objects directly between the devices.
To avoid this, it is best to install the devices at these distances:
- From the BT-RELAY to the Pico: 30 feet or less
- From the sensor to the BT-Relay: 30 feet or less
-
Mount All Devices Above Counter Height (i.e., Inline with the Pico)
The PicoMarket device is most often installed around countertop height, to be useful to the customers using it. Because of this, the relays and sensors should also be installed above countertop height to match it. This will ensure that the devices do not have to transmit through a countertop. -
Install the Relay Close to the Sensor
The closer the relay is to the sensor, the easier it will be to transmit the Bluetooth signal.
Additionally, if signal barriers between a sensor and its relay cannot be adjusted or moved, placing the two devices closer together will help. Whichever sensor has the most barriers should be the one closest to the relay.
Product Ordering
When ordering SensorSwarms for a PicoMarket or PicoMarket+, follow the instructions found at SensorSwarm - Product Overview, Product Ordering, Support, and Warranty - KB22101.
Photos of Optimal Sensor and Relay Location
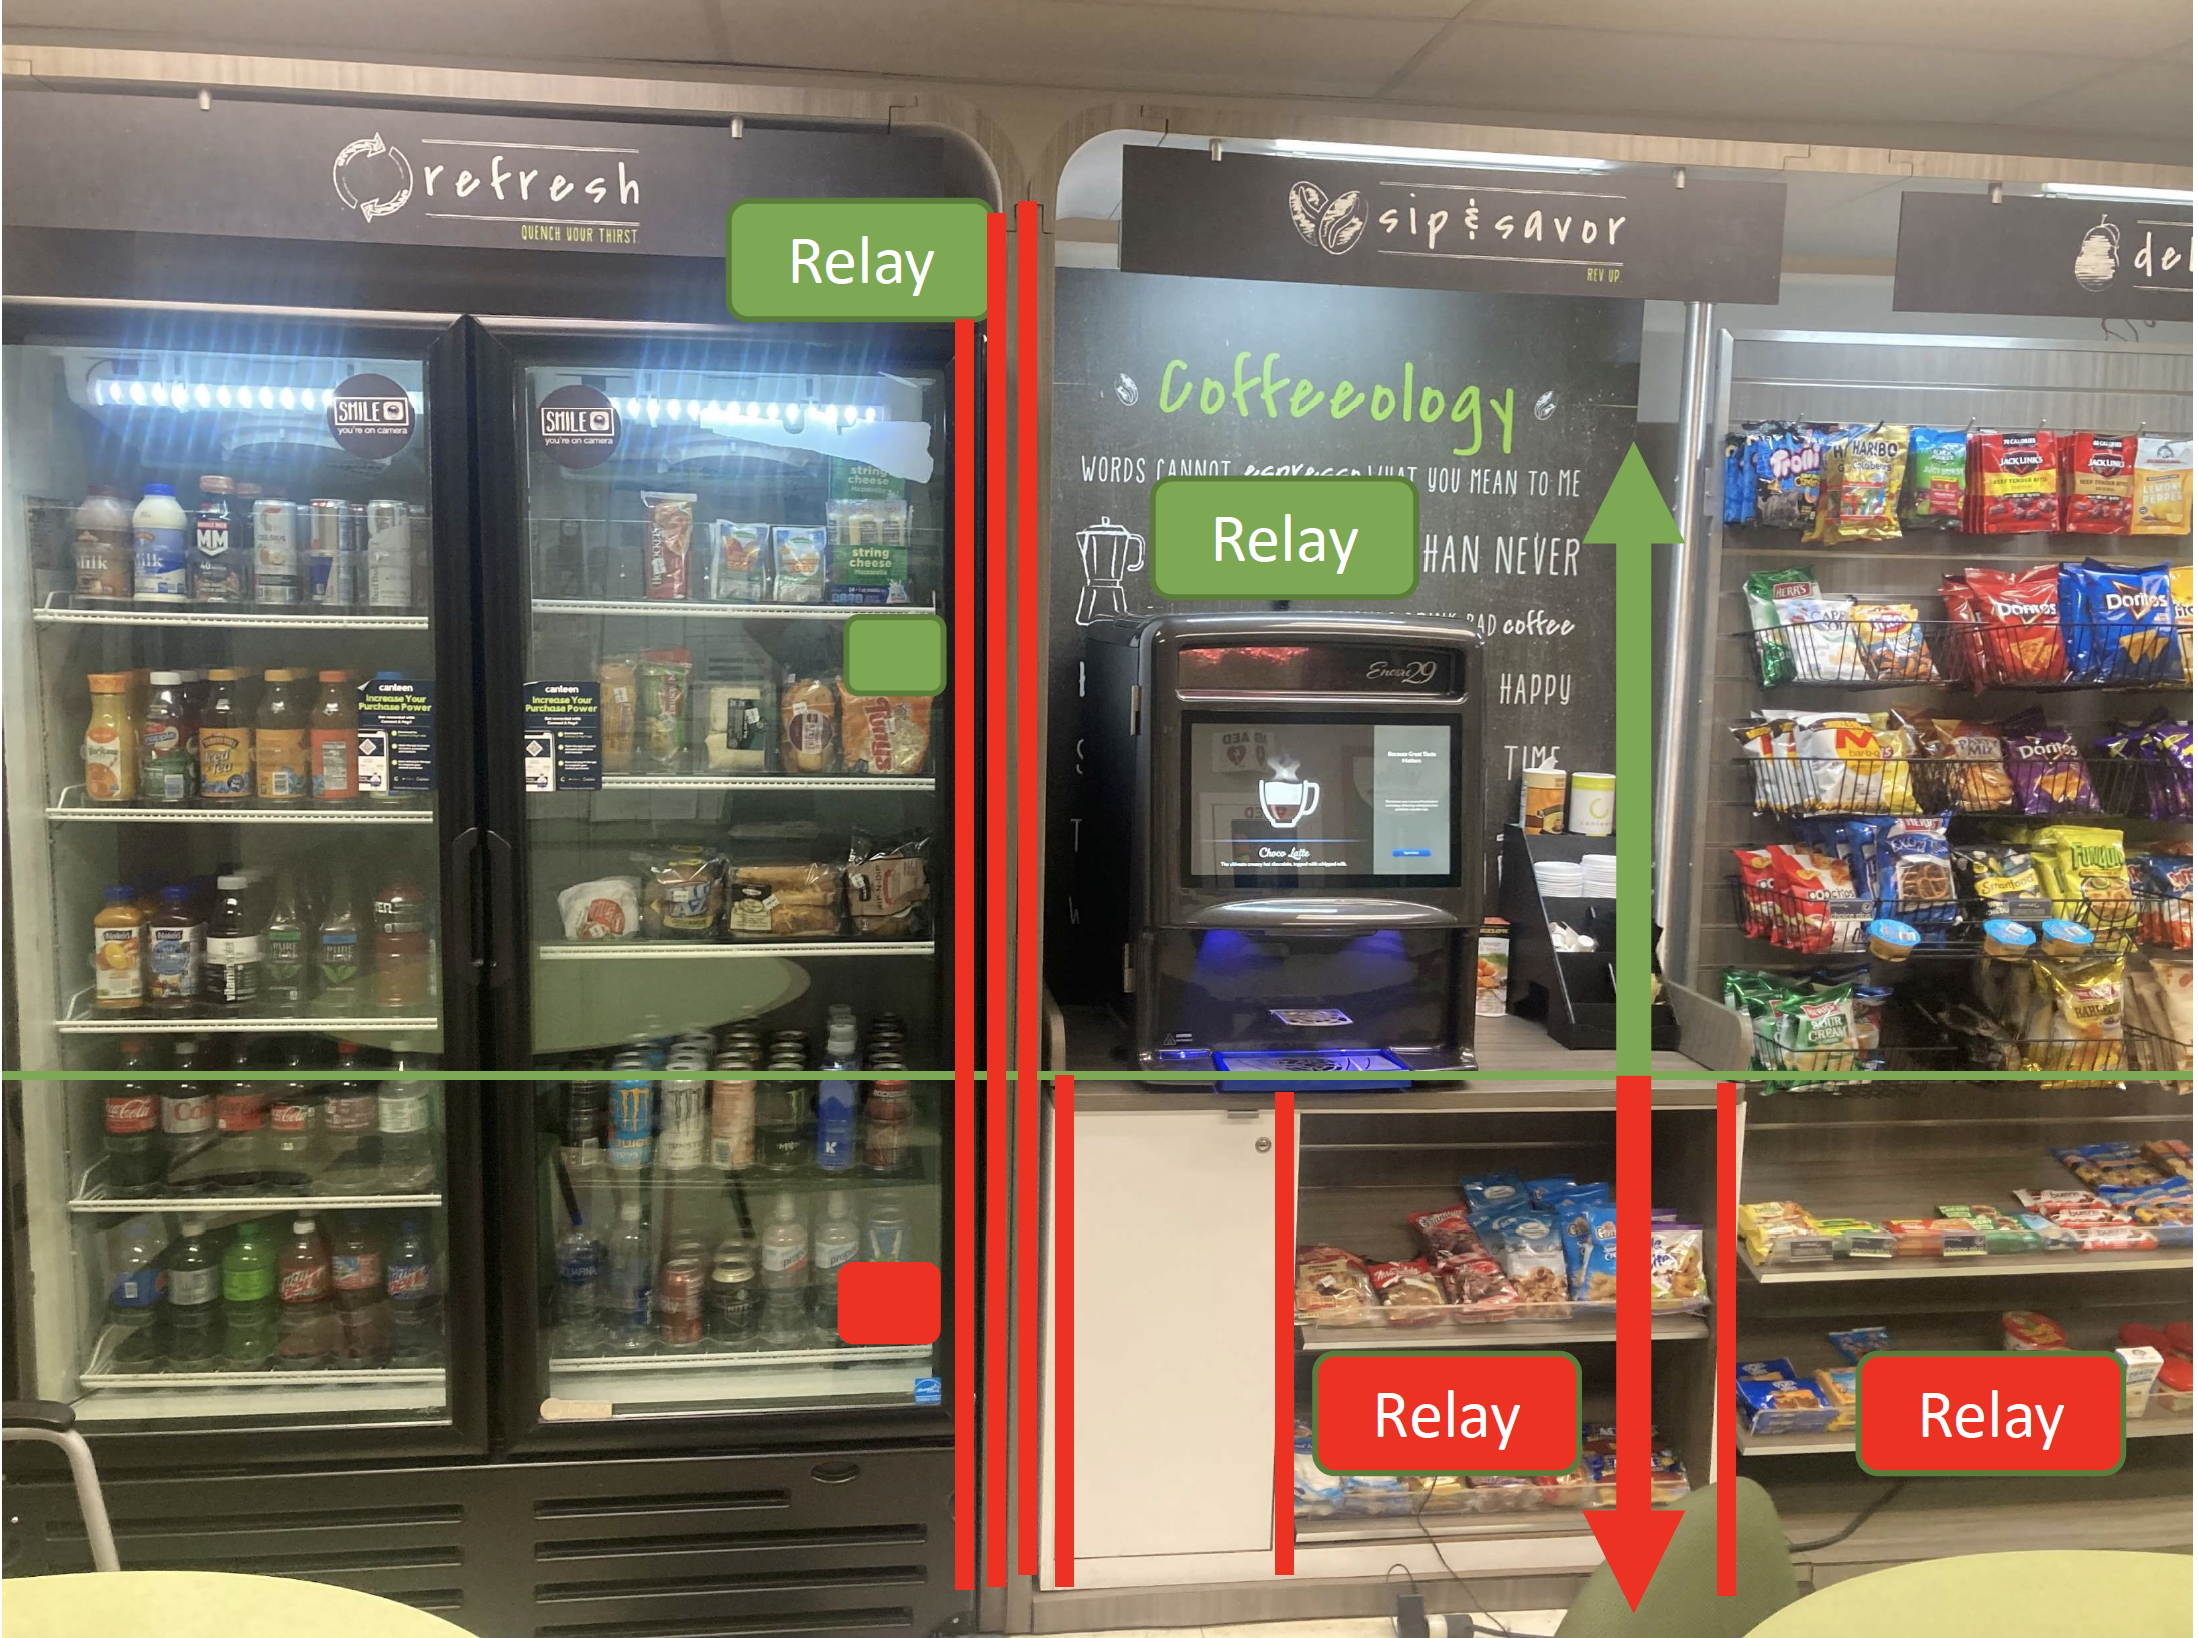
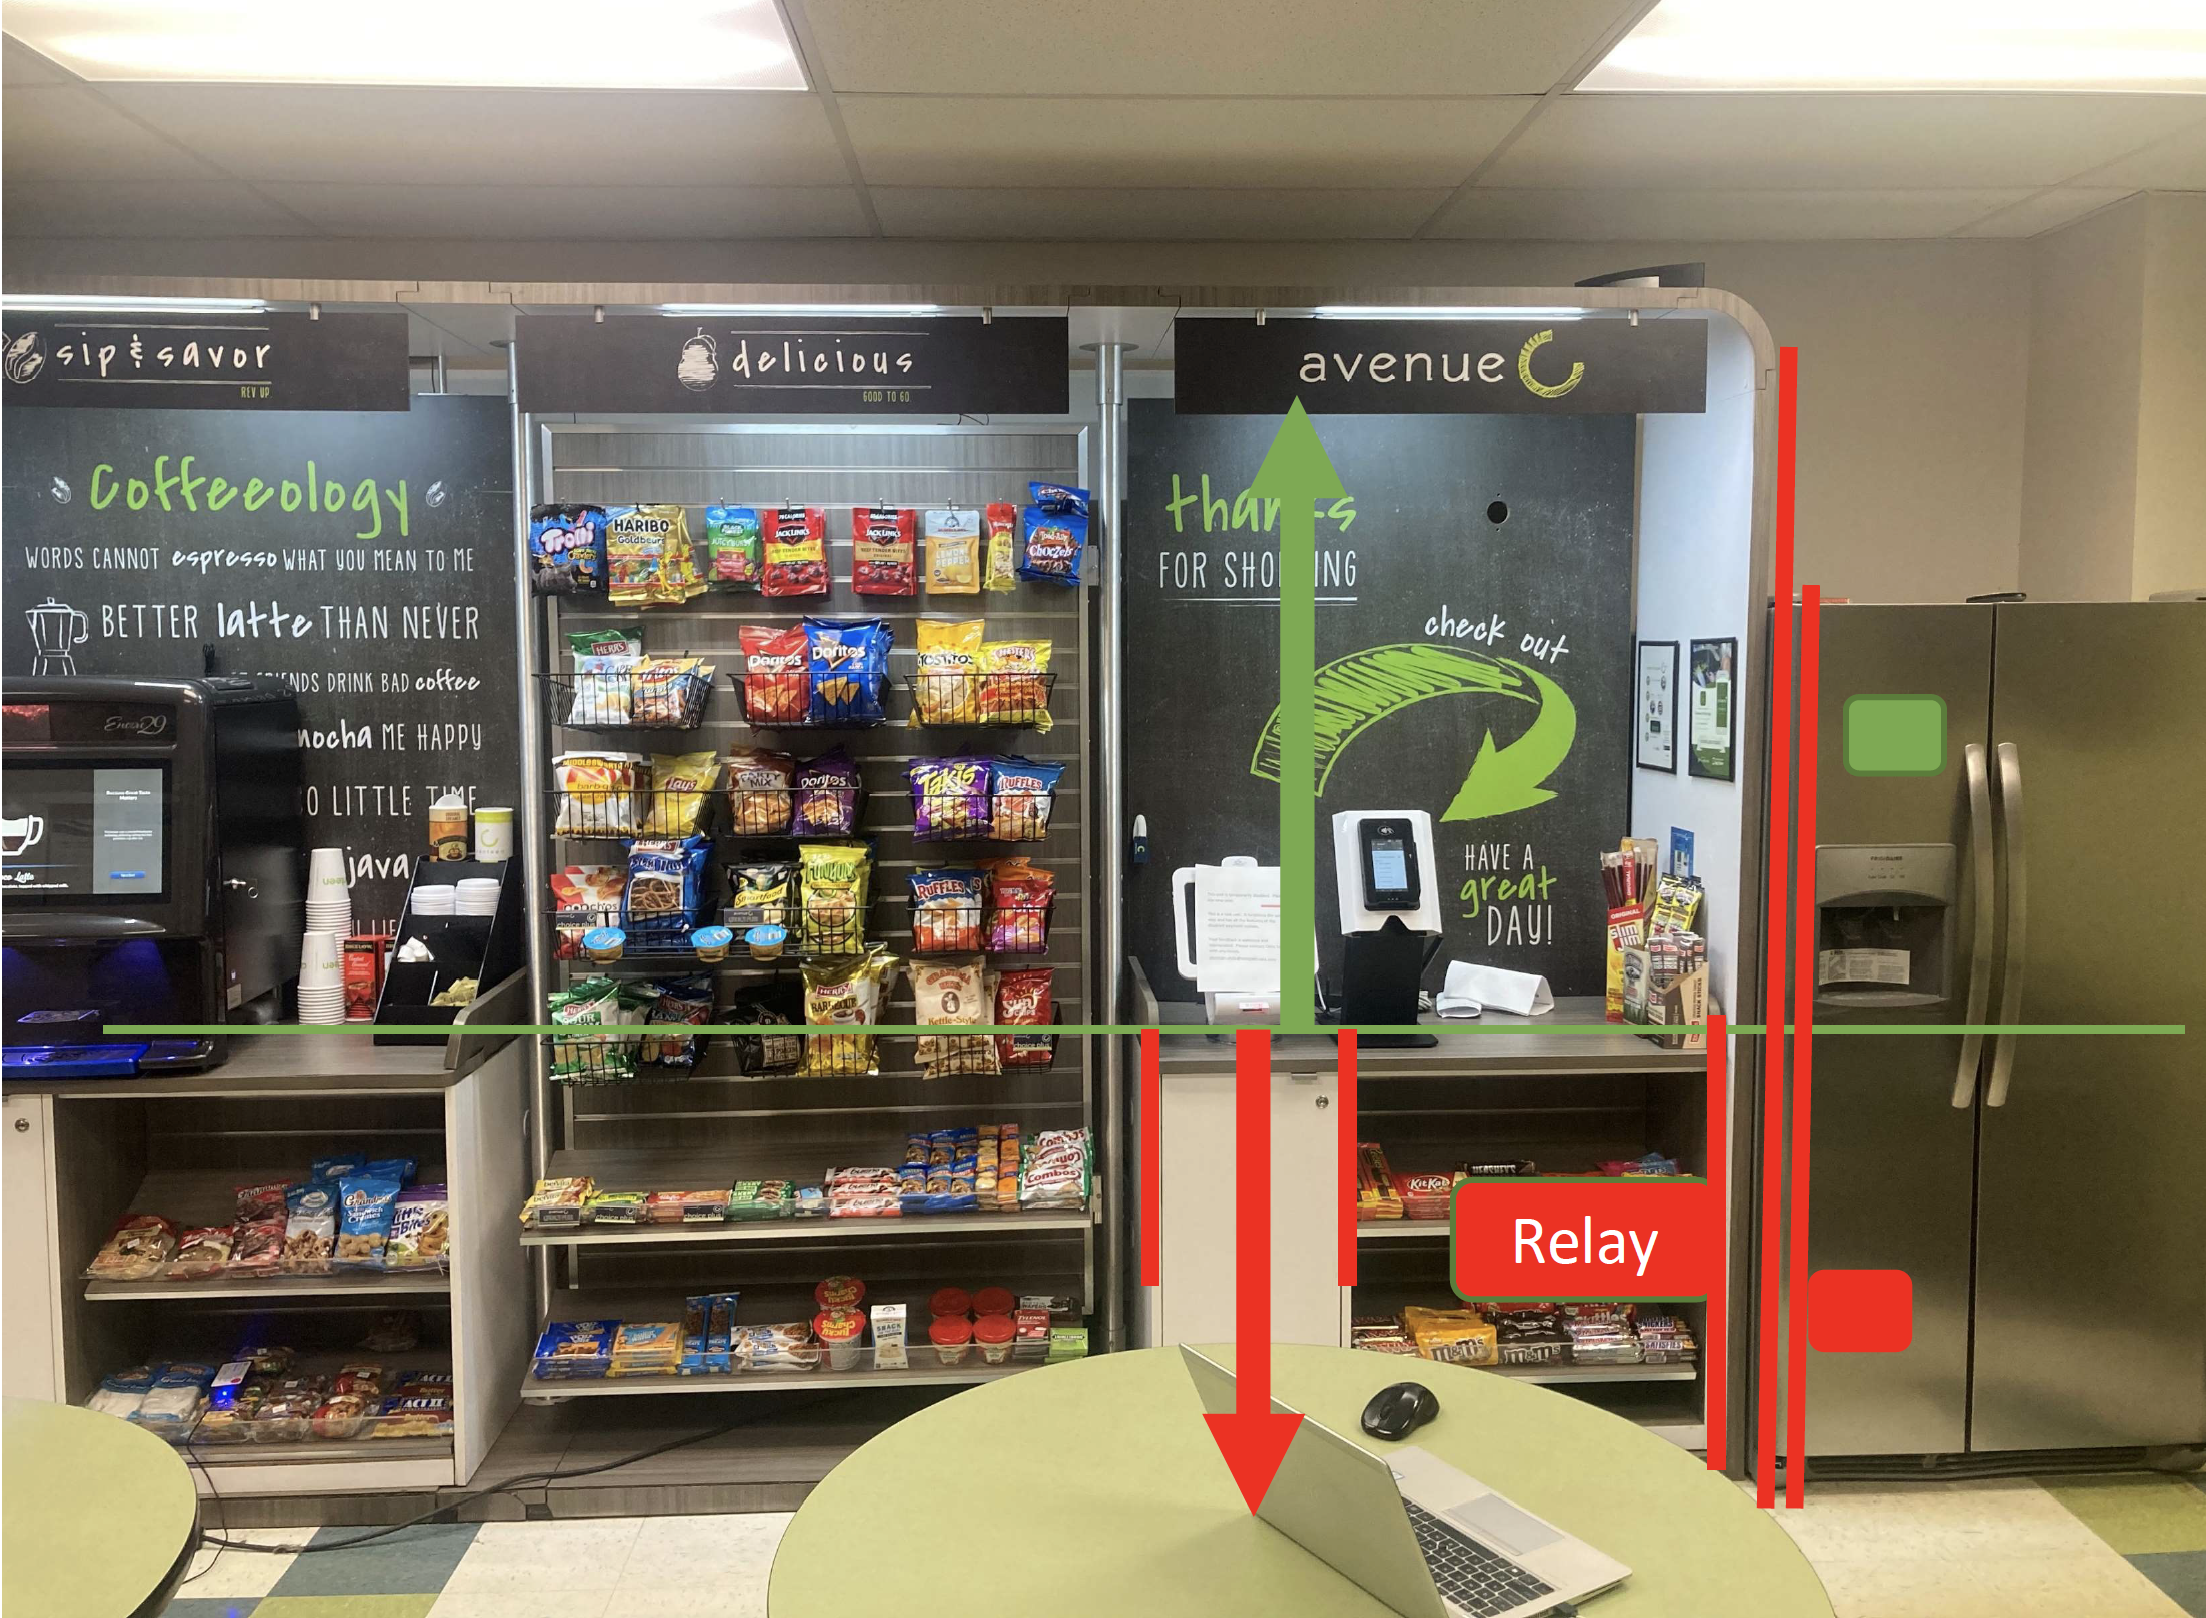
- Red lines and arrows: Signal barriers – walls, countertops, and other unified, direct, in-path obstacles that Bluetooth will struggle to transmit through
- Red squares: a poor choice for relay or sensor installation, because multiple signal barriers are between this location and the Pico device
- Green arrows: areas with a lack of signal barriers
- Green squares: a good area for relay or sensor installation, because there are fewer signal barriers here


In this example, the optimal Cooler Sensor Location would be close to the front of the cooler, just behind the glass. As is the case in many standard installations, the device should be hanging from the racking, above counter height, and as close as possible to the BT-Relay.
The optimal BT-Relay Location here would as usual be above counter height, and within 30 feet of every cooler sensor. The relay should be closest to the cooler or freezer that has the most direct barriers, ensuring the signal is strong enough to get through.
How to Install and Test Sensors
- Install and run the SwarmTemp App (Ver. 3.0 or greater) on the Pico device
- Issue Jobs to the sensors
- Install the BT-RELAY within 30 feet of the Pico device, above counter height, while positioning it as close to the coolers and freezers as possible. No cooler or freezer should be greater than 30 feet from its BT-RELAY. Plug-in power to the BT-RELAY. Wait for the red LED to turn blue.
- Setup: Shock the sensor two times. The sensor will blink green two times. The sensor will then blink green two times again, within 30 to 45 seconds of the first set of blinks. If paired correctly, the BT-Relay will then blink blue and eventually turn solid blue. This indicates it has successfully paired and completed its first Job retrieval.
- Test: Shock the sensor two times. Quickly place the sensor in a cooler or freezer near where you intend to keep the device long-term. This should be near the front of the unit, not in the back or buried behind products. The sensor will blink green two times. Check your 365 accounts to see that a successful connection has occurred. If successful, install the sensor more permanently in that location. If not successful, test in new locations until a connection can be established.
- Check-in: verify the sensor is communicating by logging into the SensorSwarm portal. Locate the serial number off the sensor you are checking.
- On the Portal page, click Sensor List on the left tree.
- Input the serial number of the sensor, then click 'Go'.
- Confirm the sensor is checking in and active on the profile information page.
- On the Portal page, click Sensor List on the left tree.
- Repeat steps 4-6 for the next sensor.
Troubleshooting Common Connection Problems
| Issue | Cause | Remedy |
| The sensor blinks red two times after being shocked twice |
The relay is not powered on. |
Shock the sensor two times only if the relay LED is solid blue. |
| The sensor cannot reach the relay | Move the sensor closer to the front of the cooler, just behind the door. | |
| The relay is busy communicating to the Pico | Move the relay closer to the sensor | |
| The relay light is solid red and then blinks red for 2 seconds before turning off. A pop-up occurs on display, indicating that the pairing failed. |
The relay cannot connect with the Pico, and times out within one minute. |
Make sure app version 3.0 or greater is installed and running. |
|
Weak cellular connection. The pairing process requires a solid path to the internet. |
Move relay closer to the Pico. Make sure the Pico is powered on and has a good internet connection. |
|
|
The relay timed out: a new pairing key was issued, but the Pico was still using an old key |
Within Android Bluetooth settings, click the 3 dots in the upper right corner and select "refresh." If refresh does not work, reset the networks settings within Android |
|
| The sensor is connected to the relay and the relay is connected to Pico, but no temperature readings appear in the hosting account after 2 hours. |
The Pico is not connected to the internet |
Make sure the Pico has an internet connection. |
|
The sensor did not get the job |
Shock the sensor two times and wait for two sets of green lights |