Purpose
This article serves as a step-by-step Pepsi guide for servicing a machine with the Stock App.
Process
The condensed steps are:
- Begin service by sending a fill-DEX.
- Restock (if needed, adjust Prekit Amount).
- Finalize service.
- After-service Inventory adjustments.
- Download Invoice.
Please see below for full step-by-step process.
1. Begin Service
First navigate to the machine's Service screen, then send a fill-DEX.
(Note: Manual PL should only be used if unable to send a fill-DEX.)
1.1 Open the Service Screen
First make sure Routes is selected in the bottom navigation menu.
- Select a Route to view Locations.
- Select a Location to view Machines scheduled for service.
- Select a Machine to open its Service screen.
1.2 Send a Fill-DEX
Start service by sending a fill-DEX (or if the fill-DEX is unavailable, use Manual PL on the Stock app Service screen), then wait for STATUS to change from Queued to In Progress.
1.3 Collect Cash
While waiting for STATUS to change, scan or input the Money Bag number and collect money from the machine.
2. Restock
Begin stocking once STATUS is In Progress.
2.1 Viewing Inventory
Tap Inventory to view products in the machine and each one's Parlevel and Qty
- Tap Inventory.
- Tap the down arrow icon to view Prekit Amount and Waste Fields.
(For Inventory terms and definitions, see the Additional Info. section at the end of this guide.)
2.2 Editing Inventory
The purpose of editing Inventory is to maintain accuracy and prevent miscalculations.
Qty is the expected machine inventory level the product will be after finalizing, and should match the actual machine inventory level after stocking.
Likewise, Prekit Amount is the expected amount to restock and should match the actual stocked amount.
(Note: Prekit Amount cannot be edited after service is finalized.)
2.2.1 Editing Qty
Qty can be adjusted in four ways:
-
Add / subtract buttons increase or decrease Qty.
-
Keypad allows for the direct input of a new Qty.
-
Prekit Amount (see 2.2.2 Editing Prekit Amount).
- Waste Fields (see 2.2.3 Editing Waste Fields).
If Link waste fields to quantity is toggled on: increases to Qty are automatically reflected on the Add Waste Field, while decreases are automatically reflected on the Expired Waste Field (see 2.2.3 Editing Waste Fields).
2.2.2 Editing Prekit Amount
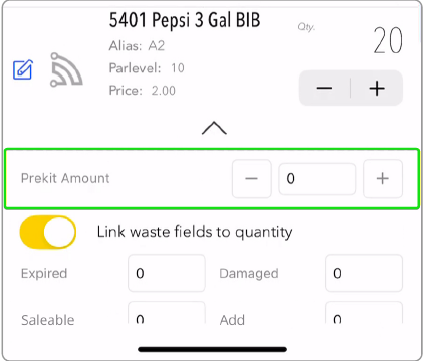
Prekit Amount refers to the number of units stocked. (Note: This cannot be changed after service is finalized.)
Use the add / subtract buttons to match the Prekit Amount to how many units were actually stocked.
Example: Inputting 3 into Prekit Amount results in 3 being automatically subtracted from Qty.
Invalid Amount (Qty) - Attempting to set Qty lower than Prekit Amount results in an Invalid Amount error.
Example: Attempting to set Qty to 0 is prohibited.
2.2.3 Editing Waste Fields
Below Prekit Amount are four Waste fields used to make specific inventory edits.
If Link waste fields to quantity is toggled on (default): Each addition to Qty adds 1 to Add; each subtraction from Qty adds 1 to Expired.
Conversely, values input into the following Waste Fields are automatically reflected on Qty:
- Inputting values into Add increases Qty by that amount.
- Inputting values into Damaged, Expired, or Saleable decreases Qty by the combined amount of those fields.
Example: Inputting 3 into Saleable subtracts 3 from Qty
Invalid Amount (Waste Fields) - If the combined values of Waste Fields set Qty lower than Prekit Amount, an Invalid Amount error will occur.
2.3 Saving Inventory
When finished viewing or editing inventory, save changes:
- Tap Save in the upper-right corner.
- Select Yes! to confirm saving changes. A temporary Inventory updated alert will appear.
3. Finalize Service
After stocking the machine and making inventory changes, finalize the service.
(Note: Prekit Amount cannot be edited after finalizing.)
Steps:
- Tap Finalize.
- Select Yes to confirm Finalize Service.
-
STATUS will temporarily change from In Progress to Pending Response.
- The Stock app then syncs with the VMS, and STATUS changes from Pending Response to Serviced.
4. (Optional) After-Finalize Inventory Adjustments
Inventory can still be edited after finalizing service, except for Prekit Amount, which is locked.
Steps:
- Tap Inventory.
- Edit Inventory using the same methods described earlier in this guide (sections 2.2.1. Editing Qty and 2.2.3. Editing Waste Fields).
-
Prekit Amount is locked and cannot be edited after service is finalized.
-
Prekit Amount is locked and cannot be edited after service is finalized.
5. Invoice
To generate the invoice:
- Tap Invoice to open Invoice Details.
- Tap Download to view the Service Invoice.
- Choose to share / print / download the invoice.
- When finished, tap Done to return to Invoice Details, then tap DONE to return to the Service screen.
The service is now finished. Tap Back to return to the Location screen. The machine will now be marked as Serviced.
Additional Info.
Inventory Terms and Definitions
-
Alias: Machine’s product selection identifier.
-
Qty: Product’s expected inventory level after service is finalized.
-
Parlevel: Product’s intended maximum-fill amount.
-
Prekit Amount: Number of units of product stocked.
-
Link waste fields to quantity: Toggle controlling whether waste field edits affect Qty and vice versa.
- Toggled-on (default): Waste Field edits edits are reflected on Qty and vice versa.
-
Toggled-off: Waste Field edits edits are not reflected on Qty and vice versa.
-
Waste Fields: More accurate way to specify inventory edits than Qty buttons.
Waste Field Types
-
Expired: Subtracts from Qty; cannot be resold.
-
Damaged: Subtracts from Qty; cannot be resold.
-
Saleable: Subtracts from Qty but can be resold (returned to truck inventory).
- Add: Adds to Qty for the machine's inventory.